# Indexing x = [3, "hello", 1.2] print ("x[0]: ", x[0]) print ("x[1]: ", x[1]) print ("x[-1]: ", x[-1]) # the last item print ("x[-2]: ", x[-2]) # the second to last item
# Slicing print ("x[:]: ", x[:]) # all indices print ("x[1:]: ", x[1:]) # index 1 to the end of the list print ("x[1:2]: ", x[1:2]) # index 1 to index 2 (not including index 2) print ("x[:-1]: ", x[:-1]) # index 0 to last index (not including last index)
# Nested for loops words = [["Am", "ate", "ATOM", "apple"], ["bE", "boy", "ball", "bloom"]] small_words = [] for letter_list in words: for word in letter_list: iflen(word) < 3: small_words.append(word.lower()) print (small_words)
# Output # ['am', 'be']
# Nested list comprehension small_words = [word.lower() for letter_list in words for word in letter_list iflen(word) < 3] print (small_words)
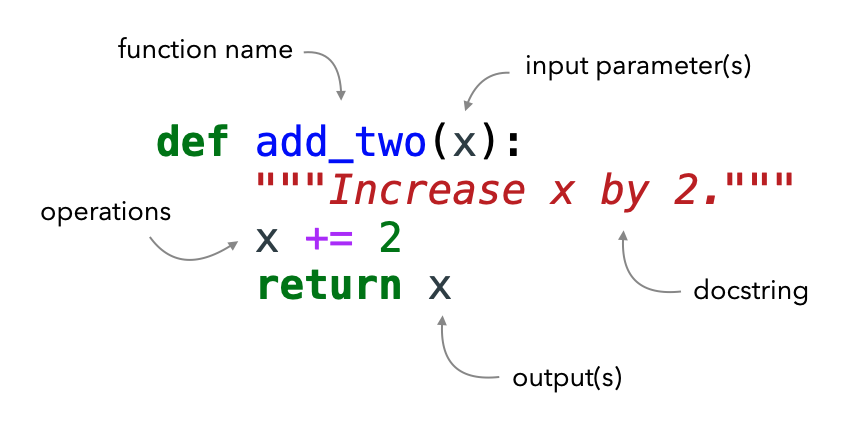
# Define the function defadd_two(x): """Increase x by 2.""" x += 2 return x
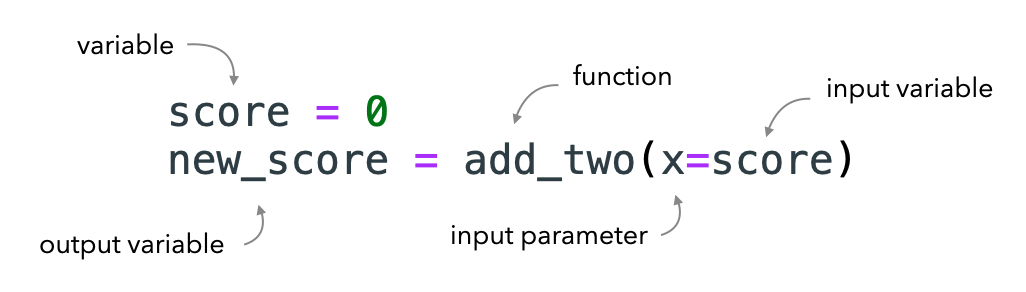
以下是使用该函数时可能需要的组件。我们需要确保函数名称和输入参数与上面定义的函数匹配。
1 2 3 4 5 6 7
# Use the function score = 0 new_score = add_two(x=score) print (new_score)
# Output # 2
一个函数可以有任意多个输入参数和输出。
1 2 3 4 5 6 7 8 9 10 11 12 13 14 15 16
# Function with multiple inputs defjoin_name(first_name, last_name): """Combine first name and last name.""" joined_name = first_name + " " + last_name return joined_name
# Use the function first_name = "Goku" last_name = "Mohandas" joined_name = join_name( first_name=first_name, last_name=last_name) print (joined_name)
# Decorator defadd(f): defwrapper(*args, **kwargs): """Wrapper function for @add.""" x = kwargs.pop("x") # .get() if not altering x x += 1# executes before function f x = f(*args, **kwargs, x=x) x += 1# executes after function f return x return wrapper
我们可以通过在主函数顶部添加 @ 符号来简单地使用这个装饰器。
1 2 3 4 5 6 7 8 9 10 11
@add defoperations(x): """Basic operations.""" x += 1 return x
operations(x=1)
# Output # 4
假设我们想要调试并查看实际执行operations()函数的操作。
1 2 3 4
operations.__name__, operations.__doc__
# Output # ('wrapper', 'Wrapper function for @add.')
# Decorator defadd(f): @wraps(f) defwrap(*args, **kwargs): """Wrapper function for @add.""" x = kwargs.pop("x") x += 1 x = f(*args, **kwargs, x=x) x += 1 return x return wrap
@add defoperations(x): """Basic operations.""" x += 1 return x
defoperations(x, callbacks=[]): """Basic operations.""" for callback in callbacks: callback.at_start(x) x += 1 for callback in callbacks: callback.at_end(x) return x
x = 1 tracker = XTracker(x=x) operations(x=x, callbacks=[tracker])
# Decorator defadd(f): @wraps(f) defwrap(*args, **kwargs): """Wrapper function for @add.""" x = kwargs.pop("x") # .get() if not altering x x += 1# executes before function f x = f(*args, **kwargs, x=x) # can do things post function f as well return x return wrap
# Main function @add defoperations(x, callbacks=[]): """Basic operations.""" for callback in callbacks: callback.at_start(x) x += 1 for callback in callbacks: callback.at_end(x) return x
x = 1 tracker = XTracker(x=x) operations(x=x, callbacks=[tracker])
# Output # 3
tracker.history
# Output # [1, 2, 3]
Citation
1
2
3
4
5
6
7
@article{madewithml,
    author       = {Goku Mohandas},
    title        = { Python - Made With ML },
    howpublished = {\url{https://madewithml.com/}},
    year         = {2022}
}