Way2AI · NumPy
TL;DR
Way2AI系列,确保出发去"改变世界"之前,我们已经打下了一个坚实的基础。
本文简单介绍了NumPy这个科学计算扩展包的必备知识。
Set up
首先我们需要导入NumPy包,做实验的时候可以设置随机种子以实现可重复性。
1 | import numpy as np |
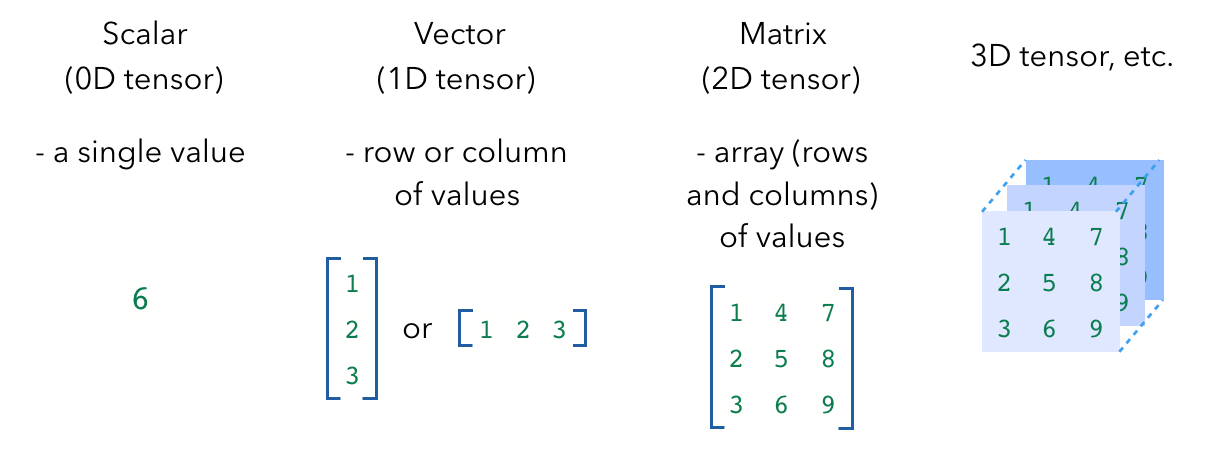
接下来分别示例 0D(标量)、1D(向量)、2D(矩阵)、3D(3维张量)。
1 | # Scalar |
NumPy当然也提供了几个函数,可以快速创建张量。
1 | # Functions |
Indexing
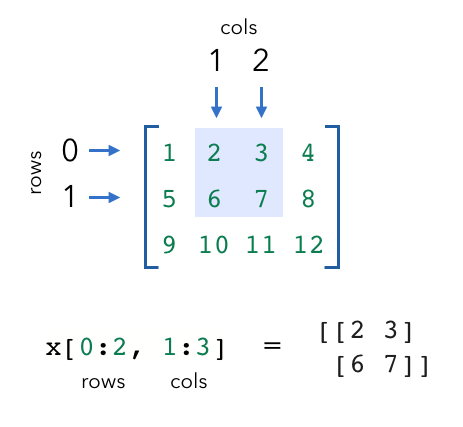
我们可以使用索引从张量中提取指定的值。
请记住,索引从0开始。与使用列表进行索引一样,我们也可以使用负数索引(其中-1是最后一个项目)。
1 | # Indexing |
Arithmetic 运算
1 | # Basic math |
Dot product 点积
在机器学习中,我们最常使用的NumPy操作之一是使用点积进行矩阵乘法。
假设我们需要取一个2x3的矩阵a和一个3x2的矩阵b的点积,我们将得到矩阵a的行及矩阵b的列作为点积的输出,也就是得到一个2x2的矩阵。点积能够正确运行需要满足的条件便是内部维度匹配,即示例中,矩阵a有3列,矩阵b有3行。
1 | # Dot product |
Axis operations
我们还可以沿着特定的轴进行操作。
1 | # Sum across a dimension |
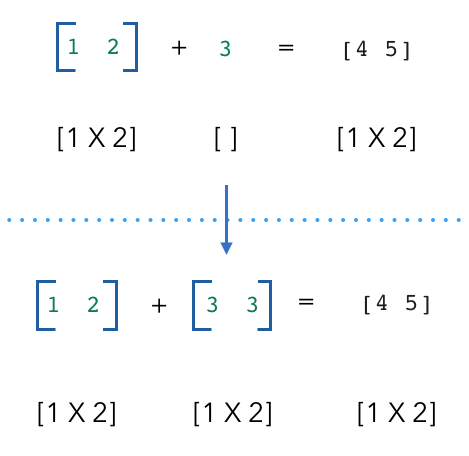
Broadcast
当我们尝试使用看似不兼容的张量形状进行操作时会发生什么?
它们的维度不兼容,但是NumPy为何仍然给出了结果?这就是广播的作用。
1 | # Broadcasting |
Gotchas
在下面的情况中,c的值是多少,它的形状是什么?
1 | a = np.array((3, 4, 5)) |
如果我们不想出现意外的广播行为,就需要小心确保 矩阵a 和 矩阵b 的形状相同。
1 | a = a.reshape(-1, 1) |
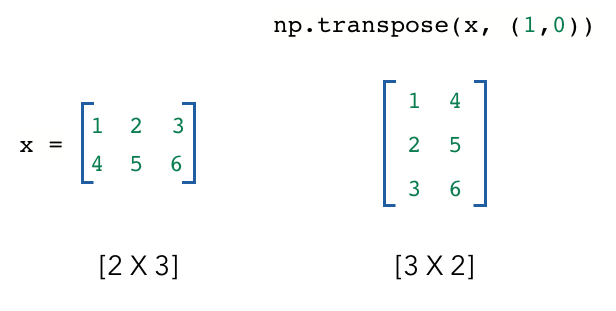
Transpose 转置
我们经常需要改变张量的维度,以进行诸如点积之类的操作。如果我们需要交换两个维度,可以对张量进行转置。
1 | # Transposing |
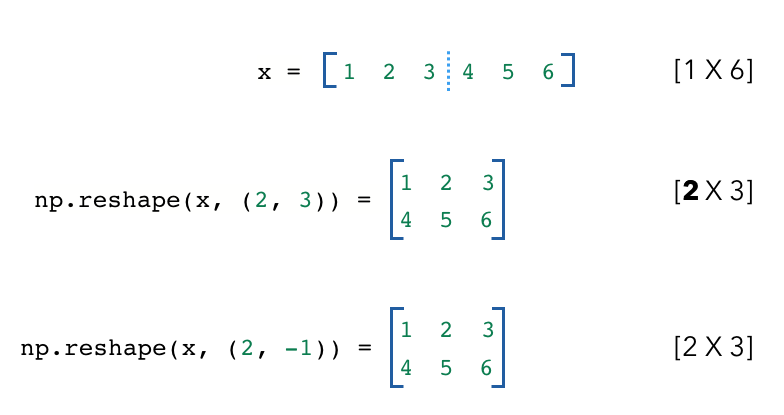
Reshape
reshape是另一种改变张量形状的办法。
如下面所示,我们reshape后的张量与原始张量具有相同数量的值。我们还可以在一个维度上使用-1,NumPy会根据输入张量自动推断该维度的大小。
1 | # Reshaping |
reshape函数的工作原理是查看新张量的每个维度,并将原始张量分成相应数量的单元。因此,在这里,新张量index 0处的维度为2,因此我们将原始张量分成2个单元,每个单元都有3个值。
Joining
我们还可以使用concatenate和stack来合并张量。
1 | x = np.random.random((2, 3)) |
Expanding / Reducing
我们还可以轻松地向张量中添加和删除维度,这样做是为了使张量能够兼容某些操作。
1 | # Adding dimensions |
Citation
1 | @article{madewithml, |
Ending
到这里,便拥有了Way2AI路上需要的NumPy的必备知识。
但我们不应该止步于此。NumPy官网 上有关于NumPy的全部知识。
- Blog Link: https://neo1989.net/Way2AI/Way2AI-NumPy/
- Copyright Declaration: 转载请声明出处。